Are you working on a design that needs printing? You must know what Bleed Mean In Graphic Design. It is a small part of the layout, but it makes a big difference. Bleed makes sure your design reaches the edge of the paper. You won’t see white gaps after trimming.
Printers often cut a little off during the final process. A design without bleed may look uneven. You can avoid this by adding extra space around the edges. That space is called bleed. It gives your design room to shift without losing key details.
Many people skip this step and end up with poor results. You should not make that mistake. Adding bleed is simple and smart. It helps you keep your design safe and clean and makes your prints look professional.
In this guide, you will learn what bleed means. You will also learn how to set it and why it matters in every printed design.
Where Bleed Appears in Your Design
Bleed appears outside the main design area. It sits past the edge where the paper will be trimmed. You need to extend colors, images, and shapes into this space. That way, nothing important gets cut off.
The bleed area is not part of the final print. Printers remove it during trimming. You only add it to make sure the design reaches the edge without flaws. If your background is white, you may not need bleed. If your design touches the edge, bleed becomes important.
You will find bleed around all four sides. It wraps the top, bottom, left, and right edges. Each side usually has the same amount of bleed. Most printers ask for 0.125 inches or 3mm.
Always check the bleed settings before exporting your file. You will avoid printing errors and save time. Bleed may look small, but it protects the quality of your design.
How Much Bleed Do You Need?
Most designs need a bleed of 0.125 inches on each side. That means your file should be 0.25 inches wider and taller than the final size. If your document is 8.5 x 11 inches, your file with bleed should be 8.75 x 11.25 inches.
Some printers may ask for more. Always check the bleed size before sending your file. You can find this information in the printer’s setup guide or print specs. Never guess the amount. The wrong size can lead to cuts in the wrong place.
Your file may not be accepted. It can also cause visible white lines around the edges. You don’t want that after spending time on your layout.
Set the bleed at the start of your project. That way, you don’t forget it later. It keeps your work neat and avoids last-minute issues.
Bleed vs. Trim vs. Safe Area: Know the Difference
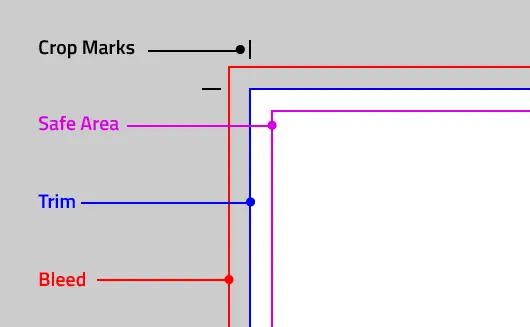
You must know three areas in every printed design: Bleed, Trim, and Safe Area. These zones help make sure your design prints correctly. They protect your work from mistakes during printing.
Bleed
Bleed goes beyond the trim line. It ensures your design reaches the edge of the paper. You extend background colors and images into the bleed area. Printers trim the paper, and small shifts can happen. Bleed prevents white lines from appearing around the edges of your design. Always set a bleed of 0.125 inches (3mm).
This extra space gives your design room to shift without cutting off important parts. Even a small misalignment can ruin your print. Use bleed for any design element that touches the edge. It keeps your prints clean and professional.
Trim
Trim is the final size of your printed design. It is the area that the printer cuts. All content should stay within the trim line. Anything outside the trim line may get cut off. For example, a business card is 3.5 x 2 inches.
The printer cuts along the trim line to match this size. Trim marks the boundaries for the final cut. It is essential to keep important design elements inside the trim. A wrong placement can lead to ruined prints. Always check the trim size before finalizing your design.
Safe Area
The safe area is where you place crucial elements. Text, logos, and images should stay inside this space. The safe area is inside the trim line. It keeps your design from being cut off during printing. Printers sometimes make small shifts when cutting. If important content is too close to the edge, it may get cut off.
The safe area keeps your design safe from these mistakes. Keep about 0.25 inches of space between important elements and the trim line. This extra space ensures your design looks perfect after trimming.
How to Set Bleed in Popular Design Tools
Setting bleed in your design tool is easy. Follow these steps to ensure your design prints correctly.
Adobe Photoshop

- Open a new document.
- Choose your design size.
- Add 0.125 inches (3mm) to the width and height. This creates the bleed area.
- Create a document of 8.75 x 11.25 inches if your design is 8.5 x 11 inches.
- Keep important content inside the trim area.
- Save the file in a print-ready format.
- Make sure to include the bleed in the final file settings.
Adobe Illustrator
- Open a new document.
- Click “File” then “New.”
- Set the bleed to 0.125 inches (3mm) for all sides.
- Extend background elements into the bleed area.
- Check the box to include the bleed. This ensures your design prints without white borders.
InDesign
- Open a new document.
- Go to “File” and select “New Document.”
- Under “Document Setup,” enter 0.125 inches (3mm) for the bleed.
- Keep important content inside the safe area.
- Extend the background to fill the bleed area.
- Make sure to include the bleed in your file.
Canva

- When starting a new project, Canva automatically adds bleed for print designs.
- Select the appropriate document size.
- Export it as a PDF.
- Canva includes the bleed area automatically.
- Always check the PDF to ensure the bleed is included.
Affinity Designer
- Open a new document.
- Select “File” and “New.”
- Under the “Dimensions” tab, set the bleed to 0.125 inches (3mm) for all sides.
- Extend background elements into the bleed area.
- Select the option to include bleed and trim marks. This ensures a clean, accurate cut.
Conclusion
Bleed is crucial in graphic design. It ensures your design prints cleanly, reaching the edges of the paper. Setting up bleed is simple across most design tools. Photoshop, Illustrator, InDesign, Canva, and Affinity Designer all make it easy to add. You just need to follow a few steps. Always double-check the bleed area before sending your design to print. Doing so prevents unwanted white edges. The extra effort guarantees your design looks sharp and professional.
FAQs
What is bleed in graphic design?
Bleed is the area outside the trim line in a design. It ensures that no white edges appear after the design is cut. You extend background colors or images into the bleed area to cover any slight cutting shifts.
How much bleed should I use in my design?
You should use 0.125 inches (3mm) of bleed on all sides. This is the standard amount used in most printing projects.
How do I set bleed in Adobe Photoshop?
Open a new document, add 0.125 inches (3mm) to the width and height, and design as usual. Make sure to include the bleed when exporting your final file.
Do I need bleed for digital designs?
No, bleed is only necessary for printed designs. Digital designs don’t require a bleed area since they are displayed on screens, not printed.
